Tuesday, July 30, 2013

The backyard orchard

When we moved into our house in March, we decided to do a few things to the inside and hold off on the yard and outdoor area for a little while. 
Prioritizing. 
BUT THEN, our neighbors peach tree started to grow delicious, beautiful, tiny peaches (approximately 80% of which fell into our backyard). And we were bitten by the fruit tree bug!
 Squirrel for scale. But mostly because it's the cutest thing ever.
I'm not 100% sure why their peaches are so small, but from the knowledge I've gained after researching for our own fruit trees, I think it's because they only have one tree. If there were another peach tree close by, they would cross pollinate each other and their fruit would grow larger and for a longer period of time. I think. We contemplated planting a peach tree on our side of the fence, but that didn't really work out in the grand scheme/our backyard master plans.

Spring is typically the best time to plant so we went to Wabash Feed Store to get started. The staff there is very knowledgeable and were able to talk us through the fruit tree buying process! We landed on a Lula Avocado tree (we eat avocados like crazy around here), and two citrus trees (cross pollination, baby!). We chose Blood Orange and Page Mandarin because both grow well in the area and aren't readily available at the grocery store.

We haven't done a whole lot to them besides water them like crazy to keep them from shriveling up in this Texas heat, but we did pick up a few tips for new tree growth from online research and talking to the folks at Wabash. First, we painted the trunk of our little Lula with a watered down white latex paint. The trunk has not yet developed bark, so it has no protection against the sun. We made sure our Lula never leaves the house without sunscreen. Tree parenting.
Secondly, we pinched our blood orange! Pinching a fruit tree means you pick off the fruit it makes it's first season so it can focus on growing roots, branches and leaves instead of putting nutrients and energy into making fruit. We only had one little blood orange and no mandarins.
We are loving our little trees. Hopefully these pictures will be a reminder of how small our trees were when we planted them--not a reminder that we once thought we could grow trees. Ha! Wish us luck!


Thursday, July 25, 2013

Christmas in July!

This is not a throwback Thursday, friends--unless you count throwing back to Monday.

This is craigslist score Thursday!

Last Friday I scoured the interwebs for a good deal on a tall Christmas tree. I started on Amazon and quickly moved to Craigslist where I found this beautiful 12’ pre-lit Elizabeth Pine for next-to-nothing. And when you buy a 12’ Christmas tree on Craigslist for next-to-nothing, you must put it up immediately…you know, to make sure all the lights turn on and that it’s not missing a huge section in the middle. Plus, I wanted to see her in all her glory standing tall in our living room! She needs some fluffing, but is otherwise fabulous and gigantic.

Two questions:

1.       How do you decorate a tree that’s not only 12’ tall, but also has a very large diameter?? Wrap it in tinsel? Do you have any great DIY tree decorations up your sleeves? I don’t want her looking all bare and exposed…but I also don’t want to spend 1.5 mil on ornaments.

2.       How do you keep cats from chewing up the light cords? My sweetest, biggest bear, Banks, chewed mine last year NOT ONLY where it connects to the wall, but also in several places inside the tree itself making it impossible to fix. We will definitely put cord protectors over the main cords to the wall, but what about the inner ones?? I read online to put plastic straws out for them to chew on and that seems to have helped, but I feel like the Christmas tree may be so tempting that even the most desirable of straws may not distract from it. Tips? Tricks?


One more thing—the boxes the tree came in had been reduced to cardboard scraps and smelled of musty storage unit, so I went out searching for plastic containers as a replacement. I went to the container store and couldn't find anything big enough on my own, so I talked to one of the sales reps who pointed me to {this} storage bag which is perfect (I bought 3). Definitely worth looking into if you struggle to get a large tree back into a small and deteriorating cardboard box each year. 
And yes, the sales rep did ask if I was just now getting around to taking down my Christmas tree. Apparently, they don’t sell many of those bags in July.


Friday, July 19, 2013

How to create a blog header with a transparent background (using PicMonkey)

Happy Friday, yall!

I’ve been working on my blog design for the past week or so, and I came across a total game-changer yesterday! This is too good not to share.
I’ve seen so many tutorials on how to make fabulous blog headers using pictures or backgrounds, but I really wanted something simple and white—and seamless! I can’t tell you how many white rectangles I downloaded for my header and I could always see the border against the white background of my blog. They never looked crisp and clean.

I saw this tutorial on A Typical English Home yesterday which introduced me to PicMonkey. I love the tutorial and website, but I don't want pictures in my header, so I started doing some hunting around the site. I found this blog post from their site on tips and tricks, and one was transparent backgrounds—bingo!

This tutorial is really easy and makes for a sleek looking blog header.

Start by clicking “Create a collage” on the homepage.
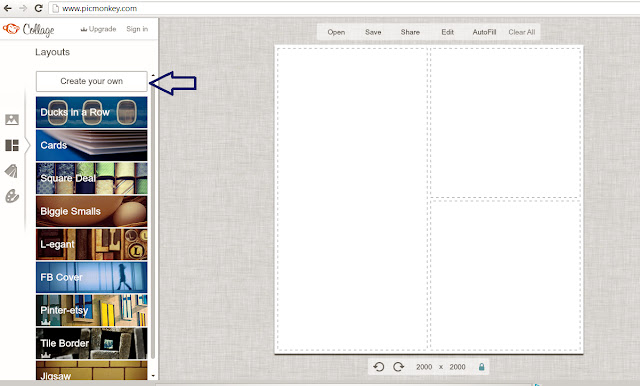
Select “Create your own” at the top. It will have one square that fills the entire area.

Go to the background tab by clicking the paint tray on the bottom left.


Check the box next to “Transparent background." The image box should turn gray to match the background of the website.
You can save this for later use, so you don’t have to repeat these steps if you want to make another header, buttons, page tabs, etc.

After you save it, it will take you back to the main screen so you can continue working. Press the edit icon.
You can start by adding whatever you like. I started with text, the P icon on the left.
Add your text. Change the fonts on the left and the colors and sizing on the right.
 If you want to add another text box, just click “Add Text” again at the top left. If you want your text to have the same exact color, write down the number in the top right and type it in that area in your next text box.
There are tons of extras that you can find in all the tabs on the left. I wanted a seal around my monogram, so I went to the word bubble tab right below text and found what I wanted in the “Nautical” section.
I changed the color to match my blog design. The inside of many of the shapes is white, which shouldn't be a problem if your blog background is white. Right click the object and send it to the back, so your wording shows up on top.
Arrange everything how you want it.
At this point your image is a square. Most blog headers are a rectangle, so you can go back to the top atom looking icon and crop your image to a rectangle.
You can also rezise in this tab by clicking the resize button at the bottom. I resized mine to 900 pixles, but it will depend on the width of your blog. You can edit your widths in the blogger template. Make sure the box next to “Keep Proportions” is checked (it should be automatically checked).
 Save your new image by clicking the save button at the top.

Upload your new header to your blog, and you’re done! 


You’ll notice that the colors changed a little bit. That’s because in the editor everything has a shadow, but when you save you image, the shadow disappears and your image will be flat and crisp!


Linked to:

The 36th Avenue


Wednesday, July 17, 2013

Dreaming of a white kitchen

When we first viewed our house with our Realtor in January, there were many things we loved and also many things we said we'd like to change (which, in my opinion, is the perfect combo!). Some needed immediate attention, like the canary yellow walls, and some fell into the wouldn't that be cool eventually category. The kitchen, however, wasn't on either of those lists--I liked it just the way it was. In fact, I'd say it was the main selling point (or at least top 3).

So, naturally, we got to work on it right away! 

You know how when you move into a house, especially one that was previously owned by someone with drastically different taste than you, it feels like you are living in someone else's space. I think that was one reason we decided to paint our kitchen cabinets--we needed to do something with impact. We had the yellow walls professionally painted, along with several other rooms, but since we didn't do that ourselves, it didn't satisfy. It felt like we lived in someone else's house, only they let us pick the paint color this time. 
We did get our painter to give us an estimate to paint our cabinets (just for giggles) and he came back at $1700! He said the price was mostly for labor, and after doing it ourselves, we totally understand. This is a huge undertaking, but we did it ourselves for around $250 AND we added things that our painter wouldn't have done, like beadboard wallpaper insets!
I should mention, we weren't living in our house at the time which made this project MUCH easier to tackle.

Here is our kitchen before (picture from the listing):
Not too bad, right? With the table gone, it's really open and we have a ton of counter space! But think of what it could be with a little paint and about 1.5 million hours of labor?!? Let's do it.

First, we took off all the doors and pulled out all the drawers. I cleaned them all really well before we got started.

Instead of sanding to rough up the surfaces (that would have taken forever!!), the folks at our home improvement store recommended Valspar Bonding Primer. We brushed it on to make sure we got in all the creases. It creates a rough, matte surface, as you would expect if you roughed it up with sandpaper.
It was so nice to use our empty living room at a makeshift workshop!

Now for the fun part...paintable beadboard wallpaper insets (great tips in this tutorial)! These are so incredibly easy to do and they add so much to plain kitchen cabinets. I bought two rolls from Lowes (at $20 each, they're a steal!), and only needed a couple feet from the second roll (each roll is 56 square feet).

Cut your pieces before you wet the adhesive. I had 4-5 different sizes of insets, so I'd cut one and use it as a template for the rest of the cabinets of that size. It's not too important to cut them exactly the right size because you'll caulk around the edges which will cover any spots where you are a little short/long/wonky.
I'm a measure once, cut once type of girl. Aint nobody got time for measuring 8000 cabinet insets twice.

The back already has adhesive, so I used a spray bottle with tap water to get the back pretty wet. Since the cabinets are horizontal, it's okay for it to have a little excess water on it. If you don't have enough water it won't activate the adhesive as well and you'll get some areas around the edges that don't want to stick. You can fold the edges into the center and let the adhesive set up for a few minutes.
That step also falls into the category of things I stopped doing once I realized how long this project was going to take :)
You don't have to worry about the back being too wet because your cabinets will be horizontal until it's dry.
When you put the insets in, you should be able to slide them around and get them into place. If you are having a hard time sliding, you may not have used enough water, or you may have let them set up too long. Just re-wet and stick again. Easy!
You can see that my edges are a little wobbly--but that's totally ok. I was told that you should put the most effort into the last 5% of a project, because that's all anyone will see, and that totally applies here. No need to be a perfectionist at this point.
I put all the insets in and let them dry overnight.
Once they were dry, I went around the edges of the wallpaper with a bead of caulk. Then, I wet my finger and ran it along the edge that I just calked, smoothing out the caulk and pushing it into the edge of the cut-in, so there was no seam between the beadboard and the wood.

Make sure to use paintable caulk!

We also put beadboard on the back of the open areas and where we have glass cabinets.
While I worked on the cabinet doors, the hubs primed the cabinets.
After the caulk dried, we started on our first coat of paint. We used Valspar Ultra Kitchen and Bath because it's made to be really durable and cleans really well. We did two coats over the whole cabinet door--even the beadboard. We used a brush on the insets because they are fairly narrow, and we used a foam roller on the edges. We also used the roller where we could on the cabinets. The paint is fairly thick, so I think the coverage and texture is really similar with a brush or a foam roller.

I ordered these bin cup drawer handle pulls (X19) and these matching knobs for the cabinets (X24). Including shipping, I replaced my entire kitchen hardware for under $75! I was a little nervous ordering sight unseen, but it worked out. They are high quality, heavy, and didn't have any dings or imperfections! I also sold our old hardware on Craigslist for $30, so I netted $45 for new kitchen hardware!
We put the doors back on and put our new hardware on and called it a day! I'm so pleased with the outcome. The hardware and beadboard make all the difference!

It took us several weeks to complete, but we were not living in the house and were mostly working on the weekends.
We love how open and airy it feels now!

BEFORE:

AFTER:


Have you used textured, paintable wallpaper? Do you love it? I think it's the perfect touch for our otherwise boring cabinet doors!


The 36th Avenue


Furniture Feature Fridays

Wednesday, July 10, 2013

I'm back!

I'm excited to finally say that the blog is back in action, y'all!!

I'm making some changes--mixing things up. I went with a new name for a few reasons. Mostly, I felt like starting over with a new design and a new concept. My old blog was almost fully a lifestyle and DIY blog, which I still LOVE and plan to continue, but I've started reading other types of blogs, too, and I didn't want to categorize myself. So, I picked a name that says just that -- The Alexander Collective. 

A collection of lifestyle, DIY, beauty, fitness, food. You name it. I'm loving the monthly favorites videos done by YouTubers and some of the "big blogs", so you may see some videos here as well!

However, I imported all the old blog posts, so we aren't starting again from scratch. It should be easy to navigate all the content. AND I'm planning to become a little more computer/blogger savvy to make my blog as user friendly as possible. As for the Picasa memory issue, I believe they changed their policy in May to include more memory space that is shared between all google services. I've done a few test posts with high resolution pictures, and it seems to be working fine! Just to be on the safe side, let's all cross our fingers, knock on wood, say a little prayer, etc.

I can't wait to get started on some real blog posts! We moved into a house a few months ago and hit the ground running with fun projects. Bear with me as I work on the design over the next few weeks.  

Stay tuned and welcome back!!


Related Posts Plugin for WordPress, Blogger...